Archives

Photo Editing- Beginner’s Pixlr Basics

Hi Everyone!

A couple months ago I created a video to help people out on how to use Pixlr. Pixlr is an online photo editor comparable to Photoshop. I don’t know how to use Photoshop and I’ve tried a couple of other online/free editors and I feel like Pixlr is the best and easiest one to use. I don’t use it to create things or graphic design. I mainly use it to alter photos like lighting (too much or too little), saturation, focus, etc. So if you have simple tasks you need to fix your photo it’s easy to achieve using this site. I am by no means an expert but I’ve played quite a bit with it and the tutorials I’ve found were either very lengthy or just not what I was looking for (most were specific to Photoshop which was pretty different). I also left links in the description of the video of sites I came across that helped with how to balance a photograph, and other tips and tricks you might find useful as well. I hope this helps someone else out there! Please let me know if it does 😀

Video:

https://www.youtube.com/watch?v=eH0VVWHKCIs

Pixlr Site:

https://pixlr.com

Edit: I would insert some of my before and afters but for whatever reason they don’t want to upload on here! check the end of the video for it if you want to see a few 😀

~~ Andrea

How to: Cover Dark or Blue Under Eye Circles

Hey Everyone!

Brace yourselves! MY BARE FACE IS COMING! haha

Jokes aside, it is really scary putting your BARE, SICK face out on the interwebs.

Here is a little background for today’s post.

I am very sick! I have had a sinus infection for about three weeks now and it has reached its peak horridness this past week. I finally went to the doc’s and got some antibiotics but I am now feeling ten times worse! Hopefully it’s what people say ” you have to get worse before you can get better.”

I usually don’t have blue/dark circles at all. The most I have is bags/puffiness but not discoloration. However, due to being sick I have had really bad blue/yellow/ugly discolorations around my eyes. My skin has also been wreaking havoc. It seems like no matter how much moisturizer I put on my skin is just like a desert. SUPER DRY. Not to mention it has also been itchy, this may be due to allergies or eczema acting up.Just last night I put on a ton of Vitamin E oil (my holy grail for fixing anything wrong with my skin- dry patches, acne, acne scars, etc!) and my face is still quenching.

Anyways this sickness gave me the opportunity to do this post for you guys since last Saturday I came up with this because I don’t usually have discoloration. I liked the way it came out! My friend Bianca told me she didn’t even notice I was wearing makeup!! So here it is!

Bare Face! No Makeup!

As you can see above: I have super dry, itchy skin (esp in the cheek area), swollen in between the eyes from my sinusitis and that is where most of the discoloration is as you’ll see in a photo below, and my lips are also super dry! They usually have more color to them :(. Also, I have my hair back which is not the most flattering for my face haha AND I have thick, unruly eyebrows and really.. can anyone be bothered with that when they are having migraines, face pain, earache, dizziness, fatigue, etc!! So bear with me but I promise these tips are good!

Image

coverdarkcircles3

So to begin, you need to understand color theory. On a color wheel, directly across blue/purple is orange/yellow. Which means they are complementary. Placed next to each other, they make each other’s colors pop more. But placed on top of each other, they should cancel out one another.

Big-Wheel

Taking that and applying it to skin, the most commonly used skin correctors are yellow and orange.

You probably have heard of salmon colored concealers to cancel out the darkness/blue/purple under the eyes. Well it works wonders!

The first product I use to color correct under my eyes is the Tarte Maracuja Creaseless Waterproof Concealer in Tan. I bought this in a set during their Black Friday sale and there were only four colors available. I chose tan, knowing medium would probably be too light. However, tan was just too dark! I have this problem A LOT! It is also a bit too orange for my skin tone. But it didn’t stop me from using this product. I made it work for me! Because it is actually very good at not creasing much and it lasts a long time.

how to cover dark under eye circles Tarte Maracuja Creaseless Concealer Tan Swatch

Tarte Maracuja Creaseless Concealer Tan

how to cover dark under eye circles Tarte Maracuja Creaseless Concealer Tan Swatch on NC35

Tarte Maracuja Creaseless Concealer Tan Swatch on NC35 skin

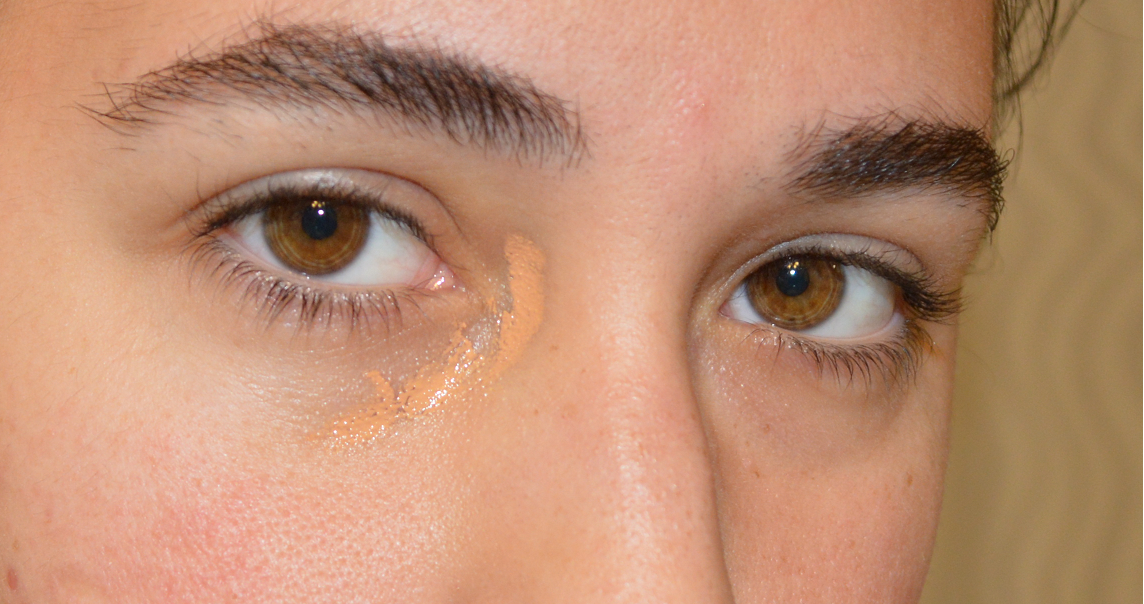
Here you can see I squirted out a tiny drop of the concealer but I will not even use half of that! Even with all the discoloration. (Usually I just use almost nothing) This product is highly pigmented. I wish I could squeeze out less, but this is the littlest amount I can usually squeeze out.

I applied the Tarte concealer in the inner corner area of my eye, where most of my discoloration is and tapped it out a bit, but not too far from its original place. This is going to cancel out the blue/purple. I also added a bit to the outer area of my eye because you could also see some blue there.

coverdarkcircles6

I usually don’t even use this much!

coverdarkcircles7

Added more because I wasn’t satisfied with coverage.. that’s how bad the discoloration is!

coverdarkcircles8

coverdarkcircles9

Blended out, you can see it is quite orange against my skin. I have a very yellow undertone but I have a very red/pink overtone in my face due to rosacea/eczema. However, it has cancelled out the blueish discoloration fairly well. In the pic because the concealer is moist there is a glare but it doesn’t flashback (no SPF). Also, because of the flash in the camera the obvious orange color is not SO obvious in person.

coverdarkcircles10

I noticed I also had some darkness/blue on the outer corner of my eye where I applied some more concealer and proceeded to blend it out.

coverdarkcircles11

Okay so here it is all blended out. Now I want to do a bit of brightening in the inner eye area because the part of my nose between my eyes is a bit swollen and also it makes you look more awake. To do this I use MAC’s Studio Finish concealer in shade NC30 which is too light for me but I can use it as basically a highlight for the inner corner of my eye. It contains SPF but used lightly it won’t flashback.

how to cover dark under eye circles MAC Studio Finish Concealer in NC30

MAC Studio Finish Concealer in NC30

coverdarkcircles12

I’m not sure if you can see the lightening effect on the inner corner of the eye because it is creamy and flashes light at the camera but you might be able to see it after I powder it. So next I use a translucent powder to set it right under my eye where it tends to crease because of fine lines. Here I am using MAC’s Prep + Prime Loose Powder. I apply it with a brush that is called PP13 Blending Fluff from Crown Brush. If you have the Real Techniques Setting brush it is very similar in shape and size to that one. It is a perfect size to fit in the orbital bone area.

how to cover dark under eye circles MAC Prep and Prime Loose Powder

MAC Prep and Prime Loose Powder

how to cover dark under eye circles Pink Blending Fluff Brush Crown PP13

Pink Blending Fluff PP13 Crown Brush

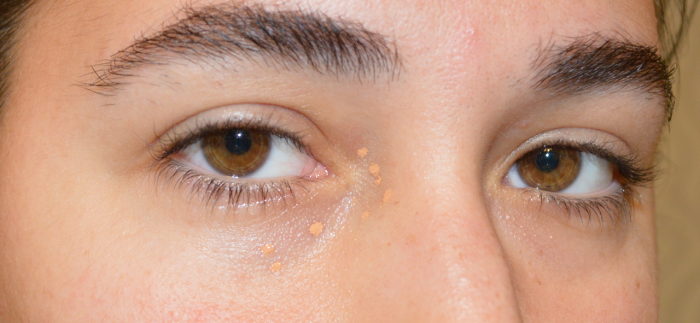
With the same brush I then applied Clinique’s Redness Solutions Instant Relief Mineral Powder all over the orange-y area. This will brighten under your eye as well as blend the concealer better into the rest of your skin.

how to cover dark under eye circles Clinique Redness Solutions Instant Relief Mineral Powder

Clinique Redness Solutions Instant Relief Mineral Powder- a yellow powder used to neutralize redness; in my case, brighten the under eye area.

how to cover dark under eye circles

That looks much better!

Now I didn’t want people getting upset that the rest of the concealer didn’t blend well into my skin. If I put foundation on it would be blended in and look great! So instead of going through my foundation routine, I just added a bit of MAC’s Mineralize Skin Finish Natural in Medium-Deep to the one side of my face since it also has a more orange undertone (which I use more in Summer when I am tan and my undertone leans more towards orange).

how to cover dark under eye circles MAC Mineralize Skin Finish Natural in Medium Deep

MAC Mineralize Skin Finish Natural in Medium Deep all over right side of face along with the concealed right eye.

beforehow to cover dark under eye circles  after

how to cover dark under eye circles comparison of concealer

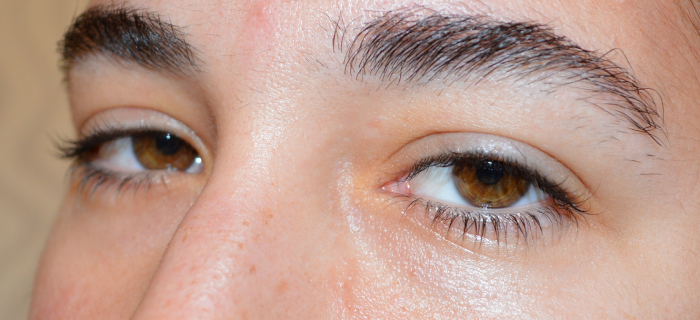
In the first picture you can see the left side of my face is bare while my right side is concealed and face is powdered; see the difference?

Here you can see that the eye that is covered up looks great compared to the one with no makeup!

how to cover dark under eye circles up close concealed eye comparison

before and after close up of my right eye

how to cover dark under eye circles before and after concealed eye

On the left is my before picture of the right eye and on the right is the after picture of my right eye. You can see the dramatic difference!

So anyways I hope you enjoyed this and learned something! Feel free to ask any questions or share your tips below!

I don’t want to leave you all with such horrendous photos of me so here are two that I like 😉

linkedinpic pic

I used to have blonde hair! haha

~~Andrea

DIY Makeup Brush Holder

Hello everyone!

This post is about making a brush holder out of… a mug! I got the idea watching Pursebuzz‘s video on a cute, pink, over-sized cup with attached saucer made out of iron. It was very big though, so she had to put a smaller cup in the middle with the actual brushes in it. It looks like it’s an outside decor item but it’s very creative to use it that way!

So I came up with an idea that would be perfect to add to the two gifts I was giving to my sister and boyfriend’s sister (who’s birthdays were coming up). I had bought my bf’s sister a bunch of Real Technique brushes (love them!) and my sister brushes/makeup I knew she would like (Milani Liquify Eyeliner, Covergirl Lash Blast original mascara (her fav), Ecotools brushes, ELF brushes, and a few other things I can’t remember).

I decided to head to the Dollar Tree to see if they had a glass or mug that I could decoupage. I have decoupaged other items as gifts and had tons of different colored tissue paper left over. I was looking for something that would be tall enough for long brushes but not too tall to fit the smaller travel sized/eye brushes. It also had to have a large enough rim but again, not TOO large like one of those big round cappuccino cups. This was probably the most challenging part of the whole project.

I finally narrowed my choice down to a shorter ceramic mug or a brandy type glass. In the end I chose the mug because I liked that it had a handle and grooves along the side.

cappuccino mug dollar tree dollar store white ceramic with grooves diy makeup brush glass cup

Dollar Tree mug!

Here are all the supplies I used and where I got them.

mod podge crafts decoupage mug diy brush holder cup glass

mod podge mixed with water in a cup mod podge crafts decoupage mug diy brush holder cup glass

Mod Podge mixed with some water in a plastic cup

  • mod podge and sponge came in a pack at AC Moore – I used a mixture of the mod podge with water in a plastic cup.
  • A stack of tissue paper which I got from AC Moore for pretty cheap as well a while back.
  • Two ribbons (a yellow and a silver) at AC Moore on sale for 50 cents each!
  • Mug and main tissue paper for the outside I got from the Dollar Tree.
  • I used a sparkly white tissue paper I received in one of my Birchboxes mixed with black on the inside.
  • Glue gun I bought at Walmart for around $10.

I decided the theme I would go for was yellow and gray. I think the combination is very classy/elegant and would match any bathroom/vanity/decor. At first I pictured making the mug gray and with yellow trim, but I found the perfect tissue paper at the dollar store that was the exact style I was going for!

pale yellow pastel shiny white glittery tissue paper ac moore dollar tree decoupage diy makeup brush holder

damask design tissue paper in gray and white diy makeup brush holder decoupage cup and black tissue paper DOLLAR TREE DOLLAR STORE

I started with the inside of the mug. I originally wanted it to be gray inside (after finding this cute paper for the outside) but did not have gray tissue paper and could not find it at the store. So, I tried to put black paper first and then the sparkly white.  It didn’t come out gray but I liked the effect anyway.

One layer of black and one layer of white (still wet):

DIY MAKEUP BRUSH HOLDER DECOUPAGE TISSUE PAPER YELLOW AND GREY GRAY DOLLAR STORE DOLLAR TREE

Mugs with black tissue paper and then the shiny/glittery white tissue paper on top

After a few more layers of white, the finished inside:

DIY MAKEUP BRUSH HOLDER DECOUPAGE TISSUE PAPER YELLOW AND GREY GRAY DOLLAR STORE DOLLAR TREE

DIY MAKEUP BRUSH HOLDER DECOUPAGE TISSUE PAPER YELLOW AND GREY GRAY DOLLAR STORE DOLLAR TREE

After letting them dry completely (you can use a hairdryer in between layers), I started on the outside. For the outside I chose a pastel yellow (rather than a bright yellow) to go underneath the patterned tissue paper. I was afraid the bright one would show through too much and I’m glad I did the pastel because it was just the subtle effect I was going for, came out perfect.

One layer of pastel yellow:

DIY MAKEUP BRUSH HOLDER DECOUPAGE TISSUE PAPER YELLOW AND GREY GRAY DOLLAR STORE DOLLAR TREE

DIY MAKEUP BRUSH HOLDER DECOUPAGE TISSUE PAPER YELLOW AND GREY GRAY DOLLAR STORE DOLLAR TREE

DIY MAKEUP BRUSH HOLDER DECOUPAGE TISSUE PAPER YELLOW AND GREY GRAY DOLLAR STORE DOLLAR TREE

I then added one layer of the patterned tissue. This was really tricky because of the grooves and shape of the mug. The mismatching of the pattern isn’t too noticeable though in the end result.

DIY MAKEUP BRUSH HOLDER DECOUPAGE TISSUE PAPER YELLOW AND GREY GRAY DOLLAR STORE DOLLAR TREE

DIY MAKEUP BRUSH HOLDER DECOUPAGE TISSUE PAPER YELLOW AND GREY GRAY DOLLAR STORE DOLLAR TREE

DIY MAKEUP BRUSH HOLDER DECOUPAGE TISSUE PAPER YELLOW AND GREY GRAY DOLLAR STORE DOLLAR TREE

DIY MAKEUP BRUSH HOLDER DECOUPAGE TISSUE PAPER YELLOW AND GREY GRAY DOLLAR STORE DOLLAR TREE

I made sure to put the yellow and patterned paper all the way to the bottom to make sure you could not see any part of the mug when it’s placed down. Also, I made the yellow and patterned paper overlap the rim of the mug because I was planning to cover it up anyway.

After I let it dry a bit, I made sure to go over the inside and outside with the mod podge a few times to make sure it was sealed and shiny (if left in the bathroom I didn’t want it getting ruined with humidity or water).

I then began with the ribbon. I first hot glued the silver ribbon along the inner rim of the mug to cover up the seam of the inside and outside tissue paper.

DIY MAKEUP BRUSH HOLDER DECOUPAGE TISSUE PAPER YELLOW AND GREY GRAY DOLLAR STORE DOLLAR TREE

I was originally going to leave it at that and then add the yellow ribbon in the middle of the silver, but I decided to add another layer of the silver right below the first one.

DIY MAKEUP BRUSH HOLDER DECOUPAGE TISSUE PAPER YELLOW AND GREY GRAY DOLLAR STORE DOLLAR TREE

I then added the bright yellow ribbon in between the two silver ones.

DIY MAKEUP BRUSH HOLDER DECOUPAGE TISSUE PAPER YELLOW AND GREY GRAY DOLLAR STORE DOLLAR TREE

I picked the bright yellow rather than a pastel because I thought it needed a pop of color! I let it dry for a day or two and this is the finished mug!

DIY MAKEUP BRUSH HOLDER DECOUPAGE TISSUE PAPER YELLOW AND GREY GRAY DOLLAR STORE DOLLAR TREE

DIY MAKEUP BRUSH HOLDER DECOUPAGE TISSUE PAPER YELLOW AND GREY GRAY DOLLAR STORE DOLLAR TREE

I forgot to mention that I left the handles without anything on them. My sister saw me making them before I was done so I asked her advice on it and she told me she would rather it be bare. I figured it was probably for the best because it would be handled a lot (lol see what I did there?) and I don’t know how good it would hold up.

I hope you guys have enjoyed this post! Let me know what else you’d like to see and, if you tried this out I’d love to see pictures. I’m sure you can add rhinestones or glitter, even tulle; anything that suits your style! I have a few more posts to come. 😀

TL;DR — Just follow the pictures!

~~Andrea